
How To Disable Blank or Black Screen After 10 minutes idle.
Blank/Black Screen - After 10 minutes of idle your desktop or laptop goes blank screen. Sometimes 5 minutes of idle goes to blank screen. If it is your first time to experience this event happened to your laptop or desktop you might wonder why this event happen. This process called power management it has a default time frame when system is idle on a specific period of time it goes to standby mode or sometimes goes to sleep depending on the settings setup by your computer manufacturer.
How many minutes does a laptop or desktop have before it goes to blank screen or standby mode?
When you installed Windows 10 on your laptop, Windows 10 sets the time frame for 5 minutes, this setting is for power saver setting. This setting helps protect your battery life to last longer than usual operation. In desktop computer, Windows 10 sets the time frame to 10 minutes because desktop computers rely on AC power and not on battery.
Can we change or edit the power settings or options on our laptop or desktop?
Definitely Yes, we can but be sure you have enough battery or you are using desktop computer.
Why should I change the settings when it was a default settings from Windows 10?
There are times when you are working on crucial or important things and you don't want to lose your work accidentally because you turn off your computer, forgot that it was actually on standby mode. Also, you are irritated because you have to press the power button in many instance in order to wake up your computer.
Slow computer takes time to open from sleep to wake up mode. I think you don't want to wait all the time to get back to your apps when it was from standby or sleep mode. 15 minutes idle goes to sleep when it is set as default on your laptop and after it goes to sleep, you have to press the power button to wake it up.
Below is an example of "Power Settings" I have done on my Desktop Computer.
You can set your own power settings in Power Options on your Windows 10.
1. Right Click "Start Menu" or on the "Window Icon" then choose "Power Options" See illustration below:

2. A new window will pop-up, "Power Options".
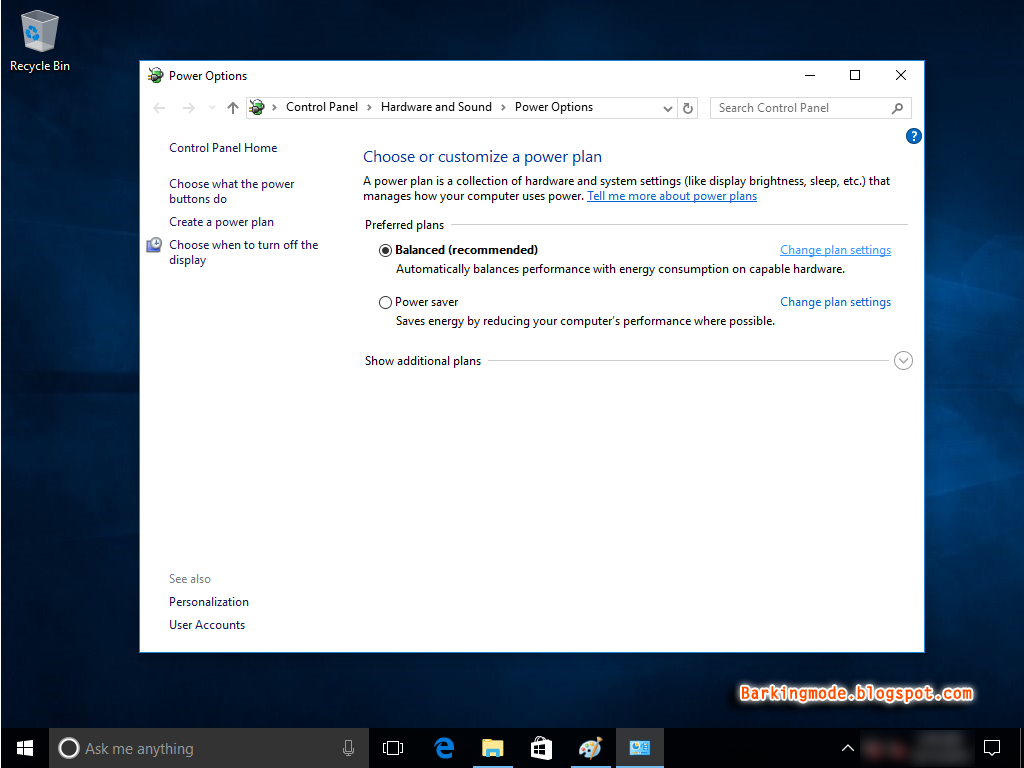
You can see that the "Balanced (Recommended)" is selected, this means it is used by the System.
Now, Click the "Change plan settings".
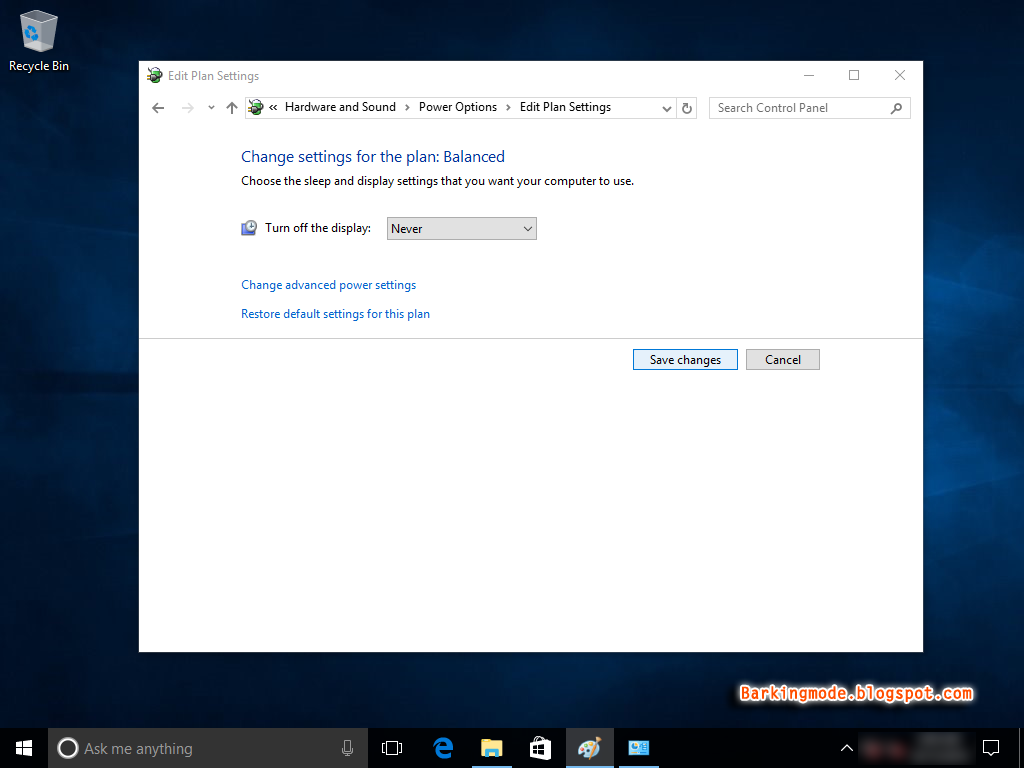
3. When you click on "Change plan settings" you will see another setting options.

In the "Turn off the display" drop down list you can choose available minutes you desire.
See below:

In this example I choose "Never".
4. You can also edit the settings in "Change advanced power settings".

By clicking the "Change advanced power settings" a new window will pop-up.

In this example I change the "Turn off hard disk after" default minutes to "9999" or "99999" for longer time frame.
5. I also, modify the 10 minutes default setting for "Turn off display after" to 9999 or 99999.

6. See the changes in the illustration below.

7. Click "Save Changes" and close the "Edit Plan Settings".
You can edit your own settings according to your needs. For your laptop settings you need to choose short period of time to make your battery life lasts longer.
Hope you'll find useful information on this post. Thank for your time reading this post.
Last modified: Dec. 11, 2019

Comments
Post a Comment