
DIY - How To Repair Laptop Adapter With Broken Wire.
Hi, everyone. Today I am going to teach you how to repair laptop adapter. This procedure I use is much more tidy than I work on before. Yes, I use tapes and glue gun in old days but the results is annoying. The durability in tapes and glue gun will not last longer. Most of the repaired adapter only last for few months or worst in weeks only. So, today we will going to use different approach by using epoxy glue instead of electrical tape and glue gun.
We usually buy laptop adapter and throw away our old adapter but today where going to use our creativity and resourcefulness. You will need only few tools and materials. Also, you are going to learn how to identify which part of the wire that cause the problem. And you will also learn the basic on how to use a tester if you don't have any idea on how to use it.
How to Identify the Problem?

If there is a led at the power adapter itself and the led is on. This means that the wire before the adapter (the wire from AC going to adapter) is okay. If there is no led, then you have to pay attention to spark when you plug the adapter. You should hear sound from spark sometimes when you plug it on the outlet.
Usually, before the wire totally breaks or open. You should experience not charging occasionally. Also, you can bend the wire to see if the laptop detect the charger. Remember that there is a led that detects the charger in your laptop. If you already determined that the wire is defective then we can proceed to the next procedure.
The materials and tools needed to fix the broken wire.
1. Soldering paste.
2. Soldering iron.
3. Soldering lead
4. Sand Paper

We usually buy laptop adapter and throw away our old adapter but today where going to use our creativity and resourcefulness. You will need only few tools and materials. Also, you are going to learn how to identify which part of the wire that cause the problem. And you will also learn the basic on how to use a tester if you don't have any idea on how to use it.
How to Identify the Problem?

So, how do we identify the problem? By the use of our perception, we can sense that the problem is in the adapter. First visually check if there are stressed area in the wire in your adapter. Check if there are led lights in your adapter or in the jack port. By the use of these led indicators we can easily see if which area of wire in our adapter is defective.
If there is a led at the power adapter itself and the led is on. This means that the wire before the adapter (the wire from AC going to adapter) is okay. If there is no led, then you have to pay attention to spark when you plug the adapter. You should hear sound from spark sometimes when you plug it on the outlet.
Usually, before the wire totally breaks or open. You should experience not charging occasionally. Also, you can bend the wire to see if the laptop detect the charger. Remember that there is a led that detects the charger in your laptop. If you already determined that the wire is defective then we can proceed to the next procedure.
The materials and tools needed to fix the broken wire.
1. Soldering paste.
2. Soldering iron.
3. Soldering lead
4. Sand Paper

5. 5-minutes epoxy glue.

6. Analog or Digital Multi meter.

Before we proceed please read the, Site policy.
The follow the steps below:
First,
Cut the wire about 2 inches near the DC plug/jack . Test the wire from DC plug/jack to the end where you cut. The range of the tester is shown above. If it reads 0 means good if 1 means open or defective. See, the reading above 1 means not connected. Make sure the tester probe is touch correctly. This ensures that the wires going to the DC plug are all good, also check the DC plug. If all items were good then proceed to the next step.
Second step.
Check the output of the adapter. To do this, plug the laptop adapter to the outlet but be sure the end of the wire are not touching each other.
How to check the laptop adapter voltage using digital multi meter?
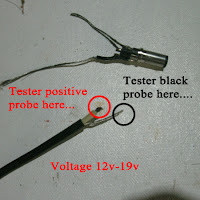
Plug the adapter first, make sure the end of the wire of your adapter does not contact with each other. This is to avoid short circuit. Turn the tester (multi meter) selector DCV or DC with 50 volts range for analog tester but if you are using digital multi meter it should be 20 V on DC range, then at end of the laptop adapter were you cut, put the black probe of the tester to the ground wire. Then, the other probe should at the other wire (positive wire). Voltage should be 12-19 volts or see adapter label.
How to identify ground wire and positive wire?
Ground wire usually black wire or open wire (no insulator).
Positive wire always red wire, white or colored wire, other use black but black goes usually with open wire.
Please illustration below.
 If there is output voltage on your laptop adapter then your'e good to go then proceed to next step.
Third step,
Connect the wires to the DC jack see connection diagram below. Use the soldering iron, paste and lead to connect the wires to the jack.

If all wires are already connected check the voltage again, this ensures that when you put epoxy there will be no problem with your solder or polarity of your connection.
Next step,
Add epoxy to your adapter, let it dry for 5 -10 minutes. Use sandpaper to smooth the surface of the epoxy.

Note: Always recheck for the output voltage and polarity of the adapter before connecting to the laptop, the ground or negative always at the outside part or expose metal part of the jack. Positive always located inside of the jack. So, careful not to reverse the polarity of the adapter. You may also find the correct polarity located at the label of the adapter.
If you have suggestion or comments please don't hesitate to add them below.

6. Analog or Digital Multi meter.

Before we proceed please read the, Site policy.
The follow the steps below:
First,
Cut the wire about 2 inches near the DC plug/jack . Test the wire from DC plug/jack to the end where you cut. The range of the tester is shown above. If it reads 0 means good if 1 means open or defective. See, the reading above 1 means not connected. Make sure the tester probe is touch correctly. This ensures that the wires going to the DC plug are all good, also check the DC plug. If all items were good then proceed to the next step.
Second step.
Check the output of the adapter. To do this, plug the laptop adapter to the outlet but be sure the end of the wire are not touching each other.
How to check the laptop adapter voltage using digital multi meter?
Plug the adapter first, make sure the end of the wire of your adapter does not contact with each other. This is to avoid short circuit. Turn the tester (multi meter) selector DCV or DC with 50 volts range for analog tester but if you are using digital multi meter it should be 20 V on DC range, then at end of the laptop adapter were you cut, put the black probe of the tester to the ground wire. Then, the other probe should at the other wire (positive wire). Voltage should be 12-19 volts or see adapter label.
How to identify ground wire and positive wire?
Ground wire usually black wire or open wire (no insulator).
Positive wire always red wire, white or colored wire, other use black but black goes usually with open wire.
Please illustration below.

Please refer output voltage from adapter label or at the bottom side of the laptop which goes with the brand name and model number. Input voltage of you laptop should match with the output voltage of your adapter.
Third step,
Connect the wires to the DC jack see connection diagram below. Use the soldering iron, paste and lead to connect the wires to the jack.

If all wires are already connected check the voltage again, this ensures that when you put epoxy there will be no problem with your solder or polarity of your connection.
Next step,
Add epoxy to your adapter, let it dry for 5 -10 minutes. Use sandpaper to smooth the surface of the epoxy.

Note: Always recheck for the output voltage and polarity of the adapter before connecting to the laptop, the ground or negative always at the outside part or expose metal part of the jack. Positive always located inside of the jack. So, careful not to reverse the polarity of the adapter. You may also find the correct polarity located at the label of the adapter.
If you have suggestion or comments please don't hesitate to add them below.


Comments
Post a Comment